
In this swift 3 tutorial you'll learn how to create a Facebook / Gmail like sidebar menu. You'll see with an example how to add the gestures to handle the sidebar menu, how to manage the side menu in order to add new elements, lock and unlock the swipe gestures and how to handle and load the views.
Prepare the project
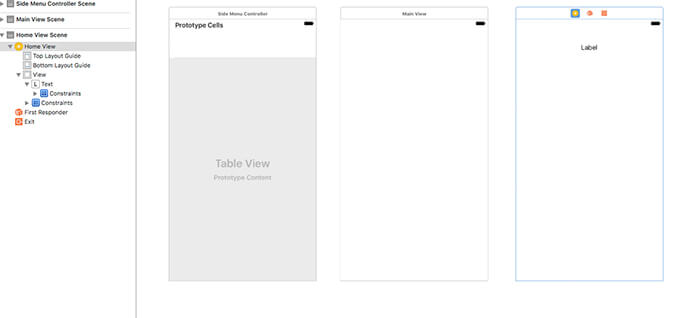
Create a new swift project by choosing an iOS single view application. Let's open the Main.storyboard and add three UIViewControllers. One will be used for the side menu, the other one will be used for the main view container, the other for the view with the content (duplicate this last view for all the content you want to have). Be sure that any view inside the storyboard has the is Initial View Controller option disabled(you can find this option inside the attribute inspector of the main view controller, otherwise you'll see a left arrow that points inside the view). You'll need to disable this option because we need to programmatically manage and create the views. Go also in the project settings, targets, general, and be sure that the Main Interface is set to a blank field. Add now inside the sidemenu view controller a table. Here what you should have till now:
Let's now open the AppDelegate.swift and let's define the main view controller that will be opened as a first view and that will manage the main view and the sidebar menu view. Inside the didFinishLaunchingWithOptions write:
func application(_ application: UIApplication, didFinishLaunchingWithOptions launchOptions: [UIApplicationLaunchOptionsKey: Any]?) -> Bool {

	window = UIWindow(frame: UIScreen.main.bounds)
	let containermainview = ContainerMainView()
	window!.rootViewController = containermainview
	window!.makeKeyAndVisible()

	return true
}
Define the view controllers
Let's create now the UIViewController. Click on File, new, file cocoa touch file, select UIViewController as a subclass.Write as a name ContainerMainView. Repeat the same step for the SideMenuController, MainView and HomeView.
Once created turn back to the main.storyboard and open the identity inspector of the created views and set as a class the classname created (SideMenuController, MainView, HomeView) and as a storyboard id write the same value.
Define the ContainerMainView
Let's implement now the ContainerMainView. This viewcontroller have to load the main view, manage the swipe gesture to open the menu, and load the menu itself. This main view will handle also the menu delegate methods, such as the menu toogle, the menu lock and unlock.
enum SideMenuState{
case Closed
case Opened
}


@objc
protocol SideMenuDelegate {
@objc optional func toogle_side_menu()
@objc optional func side_menu_enabled()
@objc optional func side_menu_disabled()

}


var sidemenudelegate:SideMenuDelegate? = nil


class ContainerMainView: UIViewController,SideMenuDelegate {


var centerViewController: MainView!
var centerNavigationController:UINavigationController!
var sidemenu_width: CGFloat = 220
var side_menu_controller: SideMenuController?
var can_i_open:Bool = true

var side_menu_state: SideMenuState = .Closed
{
didSet{
let ShowShadow = side_menu_state != .Closed
showShadowForCenterViewController(shouldShowShadow: ShowShadow)
}
}


override func viewDidLoad() {
super.viewDidLoad()


let main_storyboard = UIStoryboard(name: "Main", bundle: Bundle.main)

centerViewController = main_storyboard.instantiateViewController(withIdentifier: "MainView") as? MainView
centerViewController.ContainerMainView = self

centerNavigationController = UINavigationController(rootViewController: centerViewController)
view.addSubview(centerNavigationController.view)
addChildViewController(centerNavigationController)

centerNavigationController.didMove(toParentViewController: self)


let panGestureRecognizer = UIPanGestureRecognizer(target: self, action: #selector(ContainerMainView.handlePanGesture(_:)))

centerNavigationController.view.addGestureRecognizer(panGestureRecognizer)

sidemenudelegate = self
}


func toogle_side_menu()
{
togglePanel()
}


func togglePanel() {

if(can_i_open == false)
{
return
}

let notAlreadyExpanded = (side_menu_state != .Opened)
if notAlreadyExpanded{
addPanelViewController()
}
animatePanel(shouldExpand: notAlreadyExpanded)
}

func collapseSidePanels() {
switch (side_menu_state){
case .Opened:
togglePanel()
default:
break
}
}

func addPanelViewController() {
if(side_menu_controller == nil){
let main_storyboard = UIStoryboard(name: "Main", bundle: Bundle.main)

side_menu_controller = main_storyboard.instantiateViewController(withIdentifier: "SideMenuController") as? SideMenuController

side_menu_controller?.ContainerMainView = self


addChildSidePanelController(menu: side_menu_controller!)
}
}


func addChildSidePanelController(menu: SideMenuController) {
view.insertSubview(menu.view, at: 0)
addChildViewController(menu)
menu.didMove(toParentViewController: self)
}


func animatePanel(shouldExpand: Bool) {
if (shouldExpand) {
side_menu_state = .Opened
animateCenterPanelXPosition(targetPosition: sidemenu_width)

} else {
animateCenterPanelXPosition(targetPosition: 0) { _ in
self.side_menu_state = .Closed

self.side_menu_controller!.view.removeFromSuperview()
self.side_menu_controller = nil;
}
}
}

func animateCenterPanelXPosition(targetPosition: CGFloat, completion: ((Bool) -> Void)! = nil) {
UIView.animate(withDuration: 0.5, delay: 0, usingSpringWithDamping: 0.8, initialSpringVelocity: 0, options: .curveEaseInOut, animations: {
self.centerNavigationController.view.frame.origin.x = targetPosition
}, completion: completion)
}

func showShadowForCenterViewController(shouldShowShadow: Bool) {
if (shouldShowShadow) {
centerNavigationController.view.layer.shadowOpacity = 0.6
centerNavigationController.view.layer.shadowRadius = 15
} else {
centerNavigationController.view.layer.shadowOpacity = 0.0
}
}


func handlePanGesture(_ recognizer: UIPanGestureRecognizer) {

if(can_i_open == false)
{
return
}


let gestureIsDraggingFromRightToLeft = (recognizer.velocity(in: view).x < 0)

switch(recognizer.state){
case .began:
if(side_menu_state == .Closed){
if(gestureIsDraggingFromRightToLeft == false){
addPanelViewController()
}
showShadowForCenterViewController(shouldShowShadow: true)
}

case .changed:
let screen_center = recognizer.view!.frame.width/2
let new_center = recognizer.view!.center.x+recognizer.translation(in: view).x
if(screen_center <= new_center)
{
recognizer.view!.center.x = new_center
recognizer.setTranslation(CGPoint.zero, in: view)
}


case .ended:
if(side_menu_controller != nil)
{
let rec_center = recognizer.view!.center.x
let screen_center = recognizer.view!.frame.width/2
if(abs(screen_center-rec_center) > 20)
{

let direction = ( (recognizer.velocity(in: view).x > 10))
animatePanel(shouldExpand: direction)

}
else
{
let open = abs(screen_center - rec_center) > 40
animatePanel(shouldExpand: open)
}

}

default:
break
}
}


func side_menu_enabled()
{
can_i_open = true
}

func side_menu_disabled()
{
can_i_open = false
}

}
Define the MainView and HomeView
The MainView is the principal view that will be displayed. When this view is visible, the side menu can be opened, when another view is opened, the side menu should be disabled in order to have a better user experience. The HomeView is the content view. Here the implementation:
MainView:
class MainView: UIViewController {


var ContainerMainView:ContainerMainView!


override func viewDidAppear(_ animated: Bool) {

if(sidemenudelegate != nil)
{
sidemenudelegate!.side_menu_enabled!()
}


}

override func viewDidLoad() {
super.viewDidLoad()


}


}
HomeView
class HomeView: UIViewController {


@IBOutlet var text: UILabel!

var example:String = ""

override func viewDidAppear(_ animated: Bool) {

if(sidemenudelegate != nil)
{
sidemenudelegate!.side_menu_disabled!()
}


}

override func viewDidLoad() {
super.viewDidLoad()


text.text = example
}


}
Define the SideMenuController
This view controller will manage the elements inside the sidebar menu and will handle the user interaction as soon as a user click on an item. In this example the UInavigationviewcontroller is used to push new views.
class SideMenuController: UIViewController, UITableViewDelegate, UITableViewDataSource {


var ContainerMainView: ContainerMainView!


@IBOutlet var table: UITableView!

override func viewDidLoad() {
super.viewDidLoad()


table.dataSource = self
table.delegate = self
}


func tableView(_ tableView: UITableView, didSelectRowAt indexPath: IndexPath) {

if(sidemenudelegate != nil)
{
sidemenudelegate!.toogle_side_menu!()
}

let destViewController = UIStoryboard(name: "Main", bundle: nil).instantiateViewController(withIdentifier: "HomeView") as! HomeView

destViewController.example = indexPath.row.description

self.ContainerMainView.centerNavigationController.pushViewController(destViewController, animated: true)

}


public func tableView(_ tableView: UITableView, numberOfRowsInSection section: Int) -> Int
{
return 10
}

public func tableView(_ tableView: UITableView, cellForRowAt indexPath: IndexPath) -> UITableViewCell
{
let cell = tableView.dequeueReusableCell(withIdentifier: "cell", for: indexPath)

cell.textLabel?.text = "Menu Element"

return cell
}


public func numberOfSections(in tableView: UITableView) -> Int
{
return 1
}


}
Download the Swift 3 project of the Facebook Gmail like sidebar menu in IOS tutorial


Leave a comment