AboutContact

How to create a login screen page in swift 3: authenticate an user and keep the session active

In this new swift 3 tutorial you'll learn through an example how to create a simple login sign in screen page, how to send the login information with the HTTP post method to your server to start a new session for your authenticated account and how to keep this session stored in your iOS device in order to keep it active and avoid to write email and password again.

Project initialization

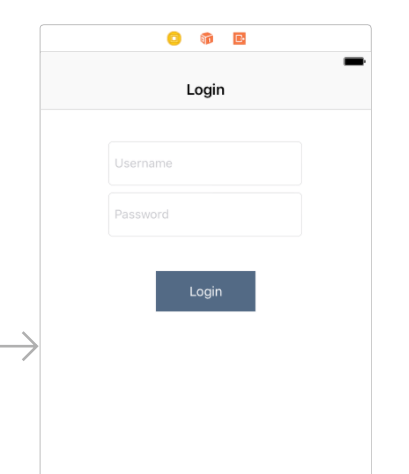
Let's create a new swift ios single view project. Open the Main.storyboard and add two TextField elements and one Button. For the password TextField be sure to check inside the Attribute inspector the Secure text entry option.

Here how the basic login screen should be.

Swift 3 login page example

Using the Assistant editor let's link the three elements to three variables. In this example I'll call them: username_input, password_input and login_button. Link also the login button to an IBAction function. I'll call the IBAction login function as DoLogin.

The DoLogin function will take the login information written and will send it to the server with the HTTP post request. All the data will be sent using the Json format. Defines also the api url variables and  the login_session variable, used to store the current session.

    let login_url = "https://www.kaleidosblog.com/tutorial/login/api/Login"
    let checksession_url = "https://www.kaleidosblog.com/tutorial/login/api/CheckSession"

    @IBOutlet var username_input: UITextField!
    @IBOutlet var password_input: UITextField!
    @IBOutlet var login_button: UIButton!
    
    var login_session:String = ""

As you can see from the above defined variables, we have two url for the authentication. The login_url is used to perform the login with the given username and password. The checksession_url is used to send the current session to the server and to ask if this session is a valid one.

Login process initialization

Let's fill the username and password with the account values (username: "[email protected]", password: "test"), to let us test a bit more quickly. As soon as the activity is ready, we have to check inside the device storage if there is a previus session to use. This session has to been to validate by sending it to the server using the checksession_url http post request.

    override func viewDidLoad() {
        super.viewDidLoad()


        username_input.text = "[email protected]"
        password_input.text = "test"
        
        
        let preferences = UserDefaults.standard
        if preferences.object(forKey: "session") != nil
        {
            login_session = preferences.object(forKey: "session") as! String
            check_session()
        }
        else
        {
            LoginToDo()
        }


    }

Login button

The login button will be used as login button and as logout button. The login button will call the login_now function with the written username and password values. The logout button will clear the session stored inside your ios device and will restore the input text field to the editable mode.

    @IBAction func DoLogin(_ sender: AnyObject) {
       
        if(login_button.titleLabel?.text == "Logout")
        {
            let preferences = UserDefaults.standard
            preferences.removeObject(forKey: "session")
            
            LoginToDo()
        }
        else{
            login_now(username:username_input.text!, password: password_input.text!)
        }
        
    }

Login function: let's sign in and authenticate to our server

Let's define the login_now function. This function will send, by using the http post method in an asynchronous way, the username and password parameters. The server will reply with a 200 response code and with the session string if the username and password are right. If the server recognizes the right login details, the app will store the session sent by the server. This string will be used later on for all the future requests, and as soon as the app is opened again, to check if the session is still active.


   func login_now(username:String, password:String)
    {
        let post_data: NSDictionary = NSMutableDictionary()

        
        post_data.setValue(username, forKey: "username")
        post_data.setValue(password, forKey: "password")

        let url:URL = URL(string: login_url)!
        let session = URLSession.shared
        
        let request = NSMutableURLRequest(url: url)
        request.httpMethod = "POST"
        request.cachePolicy = NSURLRequest.CachePolicy.reloadIgnoringCacheData
            
        var paramString = ""
        
            
        for (key, value) in post_data
        {
            paramString = paramString + (key as! String) + "=" + (value as! String) + "&"
        }
            
        request.httpBody = paramString.data(using: String.Encoding.utf8)
        
        let task = session.dataTask(with: request as URLRequest, completionHandler: {
        (
            data, response, error) in

            guard let _:Data = data, let _:URLResponse = response  , error == nil else {
                    
                return
            }


            let json: Any?
            
            do
            {
                json = try JSONSerialization.jsonObject(with: data!, options: [])
            }
            catch
            {
                return
            }
            
            guard let server_response = json as? NSDictionary else
            {
                return
            }
            
           
            if let data_block = server_response["data"] as? NSDictionary
            {
                if let session_data = data_block["session"] as? String
                {
                    self.login_session = session_data
                    
                    let preferences = UserDefaults.standard
                    preferences.set(session_data, forKey: "session")
                    
                    DispatchQueue.main.async(execute: self.LoginDone)
                }
            }


        })
            
        task.resume()
            

    }


    func LoginDone()
    {
        username_input.isEnabled = false
        password_input.isEnabled = false
        
        login_button.isEnabled = true


        login_button.setTitle("Logout", for: .normal)
    }
    
    func LoginToDo()
    {
        username_input.isEnabled = true
        password_input.isEnabled = true
        
        login_button.isEnabled = true

        
        login_button.setTitle("Login", for: .normal)
    }


Session check function: let's check if the session is still a valid one and the user do not require to authenticate again

Once the app is opened, and if a previous session is stored, the app will send to the server its stored session, in order to check if this session is still a valid one and the sign in login process is not required. In order to do this, the app will call the checksession_url http post request with the session. If the session is still a valid one, in this example the server will response with a 200 response code, otherwise the login process is required.


    func check_session()
    {
        let post_data: NSDictionary = NSMutableDictionary()
        
        
        post_data.setValue(login_session, forKey: "session")
        
        let url:URL = URL(string: checksession_url)!
        let session = URLSession.shared
        
        let request = NSMutableURLRequest(url: url)
        request.httpMethod = "POST"
        request.cachePolicy = NSURLRequest.CachePolicy.reloadIgnoringCacheData
        
        var paramString = ""
        
        
        for (key, value) in post_data
        {
            paramString = paramString + (key as! String) + "=" + (value as! String) + "&"
        }
        
        request.httpBody = paramString.data(using: String.Encoding.utf8)
        
        let task = session.dataTask(with: request as URLRequest, completionHandler: {
            (
            data, response, error) in
            
            guard let _:Data = data, let _:URLResponse = response  , error == nil else {
                
                return
            }

            
            let json: Any?
            
            do
            {
                json = try JSONSerialization.jsonObject(with: data!, options: [])
            }
            catch
            {
                return
            }
           
            guard let server_response = json as? NSDictionary else
            {
                return
            }
            
            if let response_code = server_response["response_code"] as? Int
            {
                if(response_code == 200)
                {
                    DispatchQueue.main.async(execute: self.LoginDone)
                    

                }
                else
                {
                    DispatchQueue.main.async(execute: self.LoginToDo)
                }
            }


        })
        
        task.resume()
        
        
    }


Here you'll find the swift 3 project for this example: download.


Leave a comment


Comments


- 20 December 2018 at 21:34
thanks for the tutorial, which I found quite useful for my ambition building my first ios app. Having seen your server side scripts I was wondering how the best practise should look here. Your simplified code indicates to have passwords stored on server side, let's say mongoDB. I assume for security reasons this would not be the best choice, would it? For my understanding one would save the session which would be the hash value of the password. Any proposal? Thanks ANdre
- 16 August 2018 at 11:32
help me for this >> 2018-08-16 16:27:01.803596+0700 LoginScreenApp[4547:644259] CredStore - performQuery - Error copying matching creds. Error=-25300, query={ class = inet; "m_Limit" = "m_LimitAll"; ptcl = htps; "r_Attributes" = 1; sdmn = "Email / ID Finger Kosong"; srvr = "database.domain.net"; sync = syna; }
- 12 August 2018 at 22:20
Thanks for sharing this great tutorial! Extremely detailed! I'd also recommend checking out this Login Screen written in Swift 4, which has support for Facebook Login as well.
- 30 July 2018 at 17:47
Hello, Im getting this error. What can I do ? App Transport Security has blocked a cleartext HTTP (http://) resource load since it is insecure. Temporary exceptions can be configured via your app's Info.plist file. 2018-07-30 17:32:33.442622+0200 LoginScreen[10563:690603] Cannot start load of Task <00A2C023-BF1B-4519-B9F2-62CC88C406DA>.<1> since it does not conform to ATS policy 2018-07-30 17:32:33.443115+0200 LoginScreen[10563:690608] Task <00A2C023-BF1B-4519-B9F2-62CC88C406DA>.<1> finished with error - code: -1022
theiosguy - 08 August 2018 at 10:41
This is an http error. You will have to add key to allow loading of http. Add this in your Info.plist file NSAppTransportSecurity NSExceptionDomains example.com NSIncludesSubdomains NSTemporaryExceptionAllowsInsecureHTTPLoads NSTemporaryExceptionMinimumTLSVersion TLSv1.1
- 14 December 2017 at 16:17
good work, would u share server side code in c#
- 01 November 2017 at 06:02
Did I miss the part where the user can sign out?
- 07 October 2017 at 20:02
I entered your example verbatim, and get an error at the URL line - let url:URL = URL(string: login_url)! and let url:URL = URL(string: checksession_url)! ??? I don't understand. I'm new to SWIFT.... and I gotta say - I wish I Phones worked with Android code.
- 21 August 2017 at 09:58
hi, thanks for the great tutoriaL. but could you give us the php source completely? because the txt file you have given needs get_request() and call_function() and display() functions to be defined. thanks ...
Andrea - 17 September 2017 at 20:41
Hi, sorry for the reply delay. Here it is: https://www.kaleidosblog.com/tutorial/login_data.rar
- 19 June 2017 at 09:32
thanks for your project, would you share server side code please.
Andrea - 17 September 2017 at 20:42
Hi, sorry for the delay of the reply. https://www.kaleidosblog.com/tutorial/login_data.rar
- 07 June 2017 at 05:12
please share php code with display function... thanks
- 04 June 2017 at 08:19
Hi, thanks for your project, can you give me format of data send by the server for return. Thanks for you answer. Jean-François.
- 17 April 2017 at 21:03
Hey, please share php code and CheckSession Methode! Thx
Andrea - 04 May 2017 at 12:02
Here it is: https://www.kaleidosblog.com/tutorial/login/get.txt
- 13 April 2017 at 01:58
hey, i m looking for the script of CheckSession please
Andrea - 04 May 2017 at 12:02
Here it is: https://www.kaleidosblog.com/tutorial/login/get.txt
- 04 April 2017 at 10:07
Hi, thank you for that very useful tutorial. As many others too, I would be thankful, if you can provide the code of the server. Do you use the FOS User Bundler or did you produce the code on your own? Thank you very much! Sebastian
- 02 March 2017 at 13:32
Well Server gives me correct HTTP 200 back, but session doesnt work... Can you give Infos from that session URL or the example code from session url (and maybe from login url)?? would be very kind!! Thanks!!
Andrea - 18 March 2017 at 18:09
Hi, as soon as you press on the login button, the request is sent to the server with the login data. The server checks the login data. If they are [email protected] and test as user and password, it respond with a fixed string used for the session. This is stored inside the app preferences. As soon as the app is opened, it checks for the preferences. If there is the session, it sends the session string to the server to validate it (it is the same every time for make things easier).
- 21 February 2017 at 17:15
Hi, Can you please share server side code also for the authentication?
- 03 February 2017 at 17:44
Can you share the php code also?
- 10 December 2016 at 23:22
Hey. App look great. Can you show session and login files from server? Thanks
stefan - 01 March 2017 at 18:36
Yea I also would like to see the session and login files for server. Thanks!!


AboutContactPrivacy