AboutContact

How to upload images using swift 2: send multipart post request

In this new iOS 9 tutorial you'll see how to upload an image to a server with a multipart post request using swift 2. You'll see how to allow the picture selection from the device gallery using the UIIMagePickerController and how to define the callback delegate called as soon as the image has been selected. You'll learn then how to send the image through a post request with more post parameters

Configure the project

Let's start by opening Swift and by creating a new iOS single view app. In order to allow the http protocol in swift 2, you'll need to edit the info.plist file. Search for the info.plist file, right click on it, choose open as - source code and write the following lines:

<key>NSAppTransportSecurity</key>

<dict>

	<key>NSAllowsArbitraryLoads</key>

	<true/>

</dict>

Layout definition

Let's define now the Layout of the project. Open the main.storyboard and disable the use size classes feature, we don't require that.
Now let's add inside the ViewController two buttons and an ImageView, like the image below:

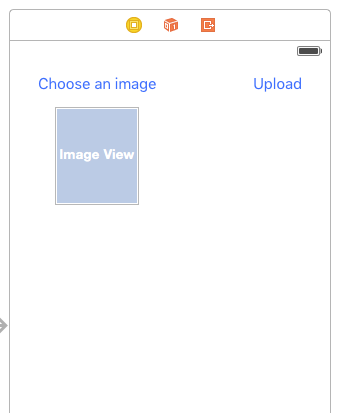
The Choose an image button will open the iOS Image Picker, the UIImageView will let us preview the selected image, while the Upload button will upload it on the server using a mutipart post request.

Let's now link, using the assistant editor, the inserted views to the variables. Click on the assistant editor, and drag and drop the elements inside the ViewController class by holding the CTRL button. Start from the Choose an image button and link it to an IBAction event. In this example I've called it selectPicture. Link now the Upload button to another IBAction event. I've called this upload_request. Finally link the ImageView as a simple UIImageView variable, I've called the variable image.

@IBOutlet var image: UIImageView!


@IBAction func selectPicture(sender: AnyObject) {

}


@IBAction func upload_request(sender: AnyObject) {

}

Implement the Image Picker and Image Picker delegate

Let's now implement the selectPicture function. This will call the UIImagePickerController and will define the UIImagePickerController delegate. This will define the callback class, called as soon as an image has been selected.

    @IBAction func selectPicture(sender: AnyObject) {
        
        let ImagePicker = UIImagePickerController()
        ImagePicker.delegate = self
        ImagePicker.sourceType = UIImagePickerControllerSourceType.PhotoLibrary
        
        self.presentViewController(ImagePicker, animated: true, completion: nil)
  
    }


    func imagePickerController(picker: UIImagePickerController, didFinishPickingMediaWithInfo info: [String : AnyObject]) {
 
        image.image = info[UIImagePickerControllerOriginalImage] as? UIImage
        self.dismissViewControllerAnimated(true, completion: nil)

    }
    

Be also sure to add in the class definition the following classes:

class ViewController: UIViewController, UIImagePickerControllerDelegate, UINavigationControllerDelegate {

Now the button choose an image will call the UIImagePickerController istance, and as soon as an image is selected, the imagePickerController callback is called. This function will display the selected image in the preview, and dismiss the UIImagePickerController view.

Upload the image on the server using the NSURLSession

It's now time to upload the image on the server. The upload_request method will call the UploadRequest function, that will then upload the choosed image. For this example I've prepared a simple php script. This script will just read the file field of the request and put back the file image name. We'll use the NSURLSession dataTaskWithRequest function.

func UploadRequest()
    {
        let url = NSURL(string: "https://www.kaleidosblog.com/tutorial/upload.php")
        
        let request = NSMutableURLRequest(URL: url!)
        request.HTTPMethod = "POST"
        
        let boundary = generateBoundaryString()

  	//define the multipart request type

        request.setValue("multipart/form-data; boundary=\(boundary)", forHTTPHeaderField: "Content-Type")
        
        if (image.image == nil)
        {
            return
        }
        
        let image_data = UIImagePNGRepresentation(image.image!)
        
        
        if(image_data == nil)
        {
            return
        }
        

        let body = NSMutableData()
        
        let fname = "test.png"
        let mimetype = "image/png"
        
	//define the data post parameter

        body.appendData("--\(boundary)\r\n".dataUsingEncoding(NSUTF8StringEncoding)!)
        body.appendData("Content-Disposition:form-data; name=\"test\"\r\n\r\n".dataUsingEncoding(NSUTF8StringEncoding)!)
        body.appendData("hi\r\n".dataUsingEncoding(NSUTF8StringEncoding)!)


        body.appendData("--\(boundary)\r\n".dataUsingEncoding(NSUTF8StringEncoding)!)
        body.appendData("Content-Disposition:form-data; name=\"file\"; filename=\"\(fname)\"\r\n".dataUsingEncoding(NSUTF8StringEncoding)!)
        body.appendData("Content-Type: \(mimetype)\r\n\r\n".dataUsingEncoding(NSUTF8StringEncoding)!)
        body.appendData(image_data!)
        body.appendData("\r\n".dataUsingEncoding(NSUTF8StringEncoding)!)
        
        
        body.appendData("--\(boundary)--\r\n".dataUsingEncoding(NSUTF8StringEncoding)!)


        request.HTTPBody = body


        let session = NSURLSession.sharedSession()

        
        let task = session.dataTaskWithRequest(request) {
            (
            let data, let response, let error) in
            
            guard let _:NSData = data, let _:NSURLResponse = response  where error == nil else {
                print("error")
                return
            }
            
            let dataString = NSString(data: data!, encoding: NSUTF8StringEncoding)
            print(dataString)
            
        }
        
        task.resume()
        
        
    }
    
    
    func generateBoundaryString() -> String
    {
        return "Boundary-\(NSUUID().UUIDString)"
    }

In this example we'll send the file and an additional post parameter, called test in this case.

PHP script to store the image

<?php

if (move_uploaded_file($_FILES['file']['tmp_name'], "image.png")) {
    echo "File uploaded: ".$_FILES["file"]["name"];	
} 

Here you'll find the project for this example: download.

UPDATED: Here you'll find the swift 3 project


Leave a comment


Comments


- 11 September 2019 at 11:40
How can I do this in swift 4? im getting lots of errors using this
- 06 December 2017 at 18:40
Tras ver muchos proyectos como este logre crear un codigo simple y funcional para cargar una o mas imagenes al servidor con PHP. Con su permiso, este es el link del proyecto: https://github.com/AngelH2/UpLoadSwiftImage
- 24 November 2017 at 12:24
tkz
- 09 May 2017 at 09:15
Hi.. Well done it's working fine. Can you please update the answer for uploading multiple images (array of images). Thank you!
- 05 May 2017 at 11:08
Thanks a lot ! This worked like charm even in Swift 3 with few changes ! Thanks a ton !!!
- 02 May 2017 at 22:24
hello thanks for the awesome tutorial it really help but I'm using azure and I vary beginner in php cloud please tell where I can put PHP script to store the image in my php also the image will be stored in sql database ? Thanks again for the help I am waiting for your answer
Andrea - 04 May 2017 at 12:09
Hi, firstly you have to be sure that php is properly installed, just use a simple file with the phpinfo command, if you see the configuration of your php then is all ok. The images will be stored in a folder on your server (the one that you decide), be sure that you have the write permission. On the sql database you can store just the image reference, the date, additional information that you want to display.
- 04 April 2017 at 13:11
Thanks for the tutorial..!!! When I saw that it worked I started to cry...I was waiting for a code like this for some time
- 12 March 2017 at 00:17
Thanks for the tutorial..
- 10 February 2017 at 19:26
Thanks for the code. It is great. I still want to POST my own filename. Hopefully the solution will come to me staring at the code some more. More importantly, sometimes the code is returning these errors. Not all the time but some times. Any suggestion why that might be? 2017-02-10 13:20:33.567076 [5041:1728065] [] nw_endpoint_flow_prepare_output_frames [2.1 79.170.40.175:80 ready socket-flow (satisfied)] Failed to use 1 frames, marking as failed 2017-02-10 13:20:33.569317 [5041:1728065] [] nw_endpoint_handler_add_write_request [2.1 79.170.40.175:80 failed socket-flow (satisfied)] cannot accept write requests 2017-02-10 13:20:33.570702 [5041:1728064] [] __tcp_connection_write_eof_block_invoke Write close callback received error: [22] Invalid argument error
- 05 January 2017 at 02:39
This worked beautifully for me, thanks! If I wanted to persist the image when I restart the app I guess I just use the URL right? (Currently it saves in the same directory as the script.)
Andrea - 06 January 2017 at 09:34
Hi, yes you can upload the image on your server and use the image url to download the image the next time the app is opened!
- 30 December 2016 at 12:11
I didn't get image name in database .only path is created
Andrea - 04 January 2017 at 20:42
Hi, you have to set the image name inside the fname variable. The file name can be get using the file path.
- 14 December 2016 at 06:36
Nice article!
- 19 October 2016 at 16:44
is there a way to use the name of the file rather than to set the file name to let fname = "test.png"
Andrea - 19 October 2016 at 21:21
Hi, you can take this information in the didFinishPickingMediaWithInfo function. The path is given by let imagepath = info[UIImagePickerControllerReferenceURL] as NSURL ..while the file name by imagepath .path!.lastPathComponent ..with this you can send this to your function. hope it helps!
- 15 September 2016 at 21:39
Hi! Thanks for all this! I'm just getting started with the code. I tried several different ways to input your code in the info.plist file, but each time it came back as an error. Can you be more specific about where the code goes in relation to the existing code that already shows up in that file?
Andrea - 16 September 2016 at 08:19
Hi, you have to write the NSAppTransportSecurity key just before the last keys. Here is a screenshot, highlighted the inserted part! https://www.kaleidosblog.com/images/info.plist_example.jpg Hope it helps
Justin - 16 September 2016 at 08:26
Hi Andrea, not really sure how to reply to your comment (there's no reply button). I downloaded your files and figured it out. The problem is that your code isn't compatible with Swift 3. Also you should note that the info.plist file also needs the following code in order to gain access to the user's photos: NSPhotoLibraryUsageDescription Type whatever here.
Justin - 16 September 2016 at 08:28
// NSPhotoLibraryUsageDescription // type whatever here. *The comment field didn't show the code. I'll try again, but it may not work. *To the people reading this take out the //
- 01 August 2016 at 07:29
only get option() and the file are not uploaded to the folder when i use this method need to add anything.
Andrea - 01 September 2016 at 09:30
Hi, check the write permission on your server and check also the max upload size option of your server!
- 29 July 2016 at 23:24
in your php script which is the image uploaded url? you want say this: if (move_uploaded_file($_FILES['file']['tmp_name'], "http://www.mypage.com/images")) { echo "File uploaded: ".$_FILES["file"]["name"]; }
- 22 July 2016 at 21:35
i only get option() and the file are not uploaded to the folder when i use this method please help
- 22 July 2016 at 04:20
Hi, great tutorial, I just wonder where the uploaded pictures are stored. I am not sure which directory you defined in the code is the one that you are uploading to
percy - 22 July 2016 at 04:21
And the only result I'm getting is Optional(). So I think images aren't uploaded.
Andrea - 01 September 2016 at 09:42
Hi, thank you for your comment. Yes you're right the images are uploaded but not stored for server storage limitation issues :)
- 21 June 2016 at 12:54
What is the maximum size of image we can upload here? and can we detect size and display alert if the size is too large ?
Andrea - 22 June 2016 at 08:49
The maximum size of image depends on your server configuration, you can change it. You can get the size of your image by defining the NSData rapresentation of your image NSData(data: UIImageJPEGRepresentation((image), 1)) and get the image size using imgData.length
- 21 June 2016 at 12:12
If we want to send video and text with image through this method can we make that or not ?
Andrea - 22 June 2016 at 08:46
Sure with this method, that is a post request, you can send what you want.
- 16 June 2016 at 14:16
Thanks a lot. It was really helpful.
- 15 June 2016 at 10:01
Just wanted to post a "thank you" for this snippet. It was much simpler than other image upload functions for Swift 2.2.
- 27 April 2016 at 06:30
Perhaps you could make the values easier to comprehend for those who have little to zero knowledge about Swift? I found it hard to add more parameters until I read the console that I'm doing it wrong. Maybe you could change "test" to "testParameter" and "hi" to "testParameterValue" or something.
Andrea - 27 April 2016 at 16:57
Hi, thank you for your comment, sure, I'll change the parameters name!
- 24 April 2016 at 21:14
Can you sent me the php script via email?
Andrea - 24 April 2016 at 21:57
- 03 April 2016 at 17:00
Hello! Thank you the tutorial! I have some issues: So i created every file as you in the example and i uploaded the php file to my server. here: http://martintimmer.com/upload.php and the xcode shows the photo is already uploaded but i don't find the file on my server. what to do now? thank you for your response!
Andrea - 03 April 2016 at 20:31
Hi, thank you for your comment. Be sure to enable the http connection into the info.plist file, check if the call to your server arrive, be sure that on you server you can the write permission, be sure that your server is configured to accept a post request with some mega (size for a generic picture).Hope it helps!


AboutContactPrivacy