
In this tutorial you'll see how to create a custom side menu for your iOS app using Swift. You'll learn how to define your custom container view that manages the center view and the side view, how to define a protocol in swift and how to define a custom table view cell.
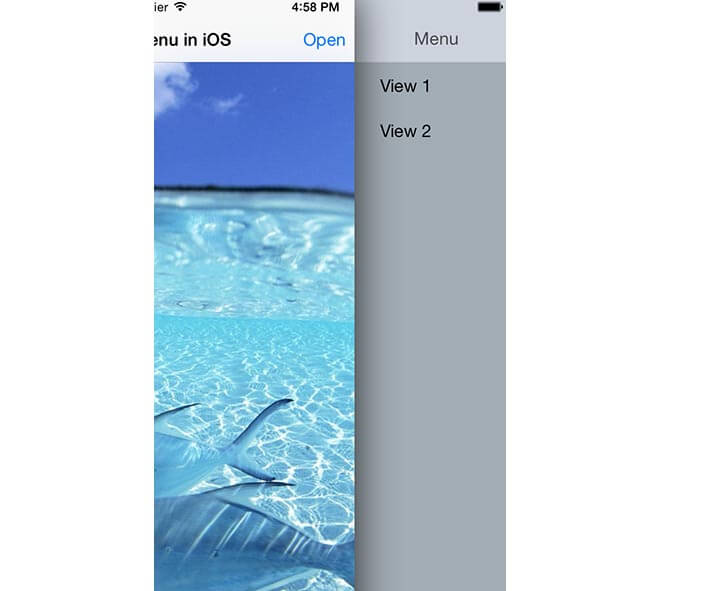
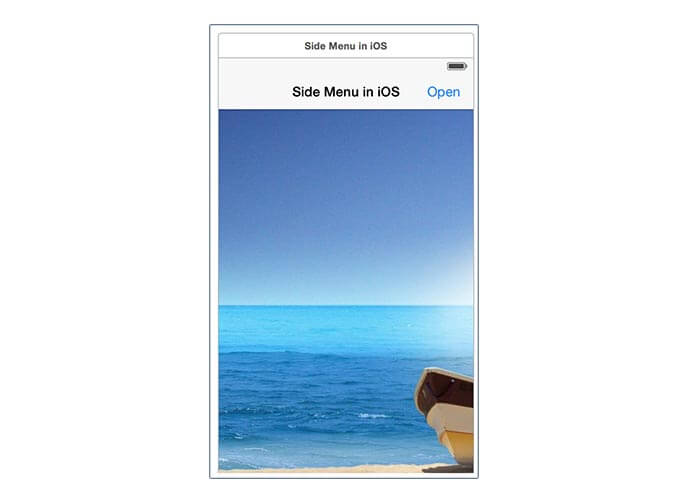
This is the side menu for iOS that you'll create.
Create the iOS project
Let's create a new Swift iOS single view project.
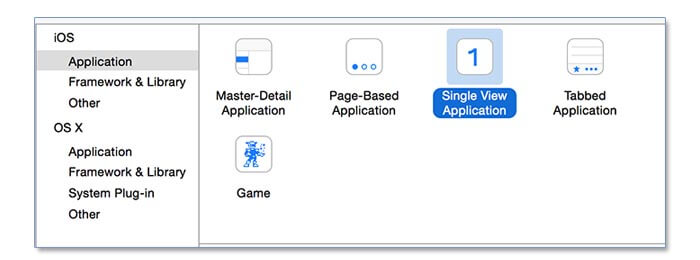
Leave blank the section called Main interface under the app configuration. We'll use our custom container as a main interface.

Let's now define the main view interface by going to the appdelegate.swift. Here you'll edit the application function, the first function that is called as soon as the app is ready.
func application(application: UIApplication, didFinishLaunchingWithOptions launchOptions: [NSObject: AnyObject]?) -> Bool {

        window = UIWindow(frame: UIScreen.mainScreen().bounds)
        let containermainview = ContainerMainView()
        window!.rootViewController = containermainview
        window!.makeKeyAndVisible()

        return true
}
Now create the required classes. Create 3 cocoa touch classes for iOS and set as a subclass the UIViewController and name them respectively: ContainerMainView, MainView and SideMenuController.
The ContainerMainView is the main class that will manage everything and all the sub views. The MainView defines the center view, while the SideMenuController defines your custom side menu.
Defining the layout in the storyboard
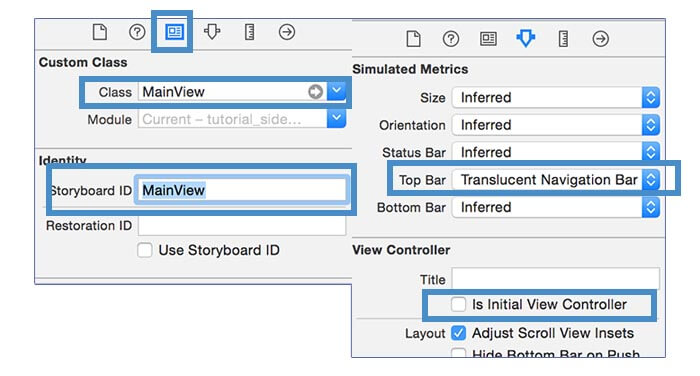
Let's now move to the storyboard. Firstly let's disable the size classes feature. Next you've to select the UIViewController that has been already added by swift. Under show attribute inspector turn off is initial view controller and put as a navigation bar the translucent navigation bar. Under the identity inspector set the sub class to MainView and the storyboard id to MainView.
Inside the MainView add the NavigationBar on the top and the Bar Buttom Item inside it. If you want add also a UIImageView and set under the attribute inspector the aspect fill mode (this allows the image to adapt in respect of the available sizes). Add also the constraints to the UIImage.
In the screenshot below I've reported how the MainView should look like.
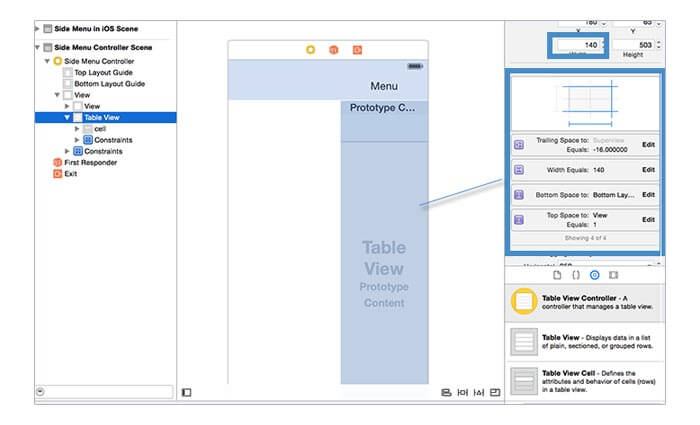
Let's define now the Side menu view. In the storyboard add a new UIViewController. In the identity inspector as a sub class set the SideMenuController and as a storyboard id set SideMenu.
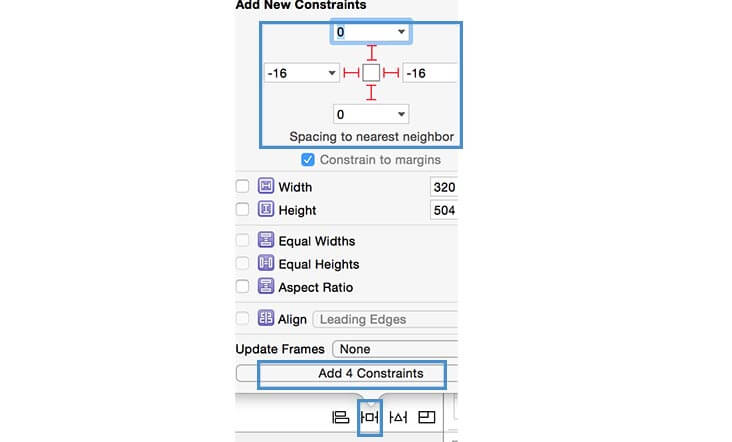
Put into the SideMenuViewController an UItableView and inside it an UITableViewCell. Set the width of the table view to 140 (this is a bit smaller than the size of the menu - 150 in this case). Add now to the table view the following constraint: width equal to 140, top margin, bottom margin and right margin. This view should look like this:
Classes definitions
Create a new Swift File and call it common. Inside it define the protocol that will be used. A protocol is an interface that allows the classes to comunicate between each other by using the functions and variable defined by the procol itself.
//delegate that require the side menu to open
@objc
protocol SideMenuDelegate {
    optional func open_side_menu()
}

//delegate from the side menu click
@objc
protocol SideMenuClick {
     var current_background: Int { get set }
     optional func request_background_update()
}

//delegate variables
var sidemenuclick:SideMenuClick?
var sidemenudelegate:SideMenuDelegate?
Put as a subclass of the container menu the SideMenuDelegate protocol. This class will implement this protocol.
Define now the required variables
class ContainerMainView: UIViewController,SideMenuDelegate {

    //variables definition
    var centerNavigationController: UINavigationController!
    var centerViewController: MainView!

    var side_menu_state: SideMenuState = .Closed
        {
        didSet{
            let ShowShadow = side_menu_state != .Closed
            showShadowForCenterViewController(ShowShadow)
        }
    }

    var side_menu_controller: SideMenuController?

    let sidemenu_width: CGFloat = 150 //define here the side menu width
Initialiaze now the variables inside the viewDidLoad, define the protocol delegates identifier to self (self is the class that will receive the events call and that will implement the protocol's functions) and add the gesture recognizer event.
override func viewDidLoad() {
        super.viewDidLoad()

        let main_storyboard = UIStoryboard(name: "Main", bundle: NSBundle.mainBundle())

        centerViewController = main_storyboard.instantiateViewControllerWithIdentifier("MainView") as? MainView


        sidemenudelegate = self

        centerNavigationController = UINavigationController(rootViewController: centerViewController)
        view.addSubview(centerNavigationController.view)
        addChildViewController(centerNavigationController)

        centerNavigationController.didMoveToParentViewController(self)

        let panGestureRecognizer = UIPanGestureRecognizer(target: self, action: "handlePanGesture:")
        centerNavigationController.view.addGestureRecognizer(panGestureRecognizer)
}
Let's define now the functions for adding the side menu view, the shadow and the animation.
    func togglePanel() {
        let notAlreadyExpanded = (side_menu_state != .Opened)
        if notAlreadyExpanded{
            addPanelViewController()
        }
        animateRightPanel(shouldExpand: notAlreadyExpanded)
    }

    func collapseSidePanels() {
        switch (side_menu_state){
        case .Opened:
            togglePanel()
        default:
            break
        }
    }

    func addPanelViewController() {
        if(side_menu_controller == nil){
            let main_storyboard = UIStoryboard(name: "Main", bundle: NSBundle.mainBundle())

            side_menu_controller = main_storyboard.instantiateViewControllerWithIdentifier("SideMenu") as? SideMenuController

            addChildSidePanelController(side_menu_controller!)
        }
    }
    func addChildSidePanelController(menu: SideMenuController) {
        view.insertSubview(menu.view, atIndex: 0)
        addChildViewController(menu)
        menu.didMoveToParentViewController(self)
    }

    func animateRightPanel(#shouldExpand: Bool) {
        if (shouldExpand) {
            side_menu_state = .Opened
            animateCenterPanelXPosition(targetPosition: -sidemenu_width)

        } else {
            animateCenterPanelXPosition(targetPosition: 0) { _ in
                self.side_menu_state = .Closed

                self.side_menu_controller!.view.removeFromSuperview()
                self.side_menu_controller = nil;
            }
        }
    }

    func animateCenterPanelXPosition(#targetPosition: CGFloat, completion: ((Bool) -> Void)! = nil) {
        UIView.animateWithDuration(0.5, delay: 0, usingSpringWithDamping: 0.8, initialSpringVelocity: 0, options: .CurveEaseInOut, animations: {
            self.centerNavigationController.view.frame.origin.x = targetPosition
            }, completion: completion)
    }

    func showShadowForCenterViewController(shouldShowShadow: Bool) {
        if (shouldShowShadow) {
            centerNavigationController.view.layer.shadowOpacity = 0.8
            centerNavigationController.view.layer.shadowRadius = 20
        } else {
            centerNavigationController.view.layer.shadowOpacity = 0.0
        }
    }

    func open_side_menu()
    {
        togglePanel()
    }
In the following the function for the gesture recognition is defined.
        func handlePanGesture(recognizer: UIPanGestureRecognizer) {
        let gestureIsDraggingFromLeftToRight = (recognizer.velocityInView(view).x > 0)

        switch(recognizer.state){
        case .Began:
            if(side_menu_state == .Closed){
                if(gestureIsDraggingFromLeftToRight == false){
                    addPanelViewController()
                }
                showShadowForCenterViewController(true)
            }

        case .Changed:
            let screen_center = recognizer.view!.frame.width/2
            let new_center = recognizer.view!.center.x+recognizer.translationInView(view).x
            if(screen_center >= new_center)
            {
                recognizer.view!.center.x = new_center
                recognizer.setTranslation(CGPointZero, inView: view)
            }


        case .Ended:
            if(side_menu_controller != nil)
            {
                let rec_center = recognizer.view!.center.x
                let screen_center = recognizer.view!.frame.width/2
                if(abs(screen_center-rec_center) > 20)
                {

                    let direction = ( (recognizer.velocityInView(view).x < 10))
                    animateRightPanel(shouldExpand: direction)

                }
                else
                {
                    let open = abs(screen_center - rec_center) > 40
                    animateRightPanel(shouldExpand: open)
                }

            }

        default:
            break
        }
    }
Let's code now the SideMenuController. Firstly connect the table view from the storyboard to the class. Next define an array for the menu elements and set the data source and delegates.
class SideMenuController: UIViewController,UITableViewDataSource, UITableViewDelegate {

    @IBOutlet var tableview: UITableView!
    var menu = Array<String>()
    var bcolor=UIColor(red:162/255.0,green:172/255.0,blue:180/255.0,alpha:1.0)

    override func viewDidLoad() {
        super.viewDidLoad()

        menu.append("View 1")
        menu.append("View 2")

        tableview.dataSource = self
        tableview.delegate = self
        tableview.backgroundColor = UIColor.clearColor()
        self.view.backgroundColor = bcolor
    }

    func tableView(tableView: UITableView, numberOfRowsInSection section: Int) -> Int
    {
    return menu.count
    }

    func tableView(tableView: UITableView, cellForRowAtIndexPath indexPath: NSIndexPath) -> UITableViewCell
    {
        let cell = tableView.dequeueReusableCellWithIdentifier("cell", forIndexPath: indexPath) as UITableViewCell


        cell.textLabel?.text = menu[indexPath.row]
        cell.backgroundColor = UIColor.clearColor()

        var bgColorView = UIView()
        bgColorView.backgroundColor = UIColor.clearColor()
        cell.selectedBackgroundView = bgColorView

        return cell

    }
Finally the MainView class is defined. This class implements the SideMenuClick protocol for changing the background as soon as a click event on the side menu occured.
class MainView: UIViewController,SideMenuClick {

    @IBOutlet var background: UIImageView!
    var current_background: Int = 0
    var b_list : [String] = ["im1.jpg", "im2.jpg"]


    @IBAction func Open(sender: AnyObject) {
        sidemenudelegate?.open_side_menu?()
    }

    override func viewDidLoad() {
        super.viewDidLoad()

        background.image = UIImage(named: b_list[current_background])
        sidemenuclick = self
    }

    func request_background_update()
    {
        background.image = UIImage(named: b_list[current_background])
    }

}
Here you can find the working example: download the example


Leave a comment