
You'll learn how to define a custom UITableView cell in swift for iOS. You'll see the main steps to design and define a custom UITableView cell, a custom uitableview header and an uitableview footer sections.
This is the example for custom UITableView cell you'll obtain using Swift:

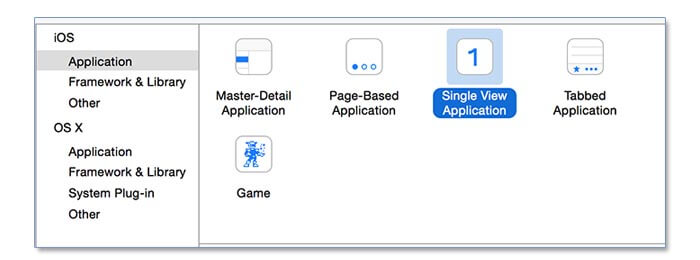
Let's create a new swift iOS single view application.
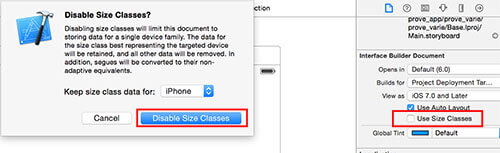
In the main.storyboard uncheck the use size classes feature.
Custom UITableViewCell: Layout Definition
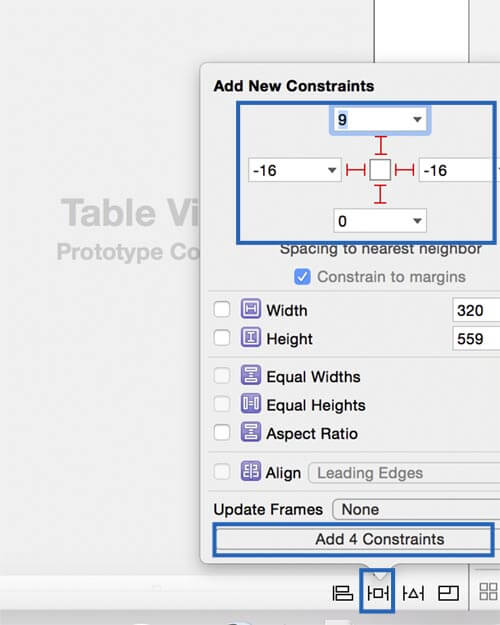
In the main.storyboard let's add the UITableView component. Add the constraints (top, left, right, bottom) to the margin view.
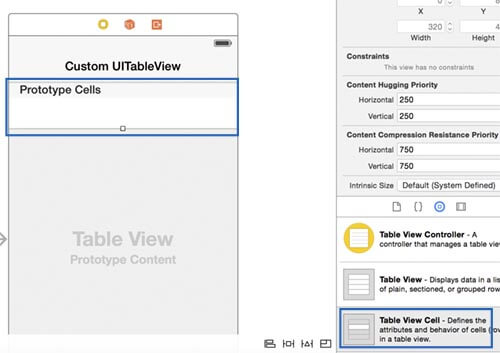
Inside the UITableView let's add an UITableViewCell component. This last component allows us to define a custom cell for the table view.
Create a new cocoa touch iOS file, call it CustomCell and set it as a subclass of UITableViewCell.
Turn back to the main.storyboard, select the cell component previously added and under the identity inspector section set the class to CustomCel, while under the Attribute Inspector set the identifier to cell.
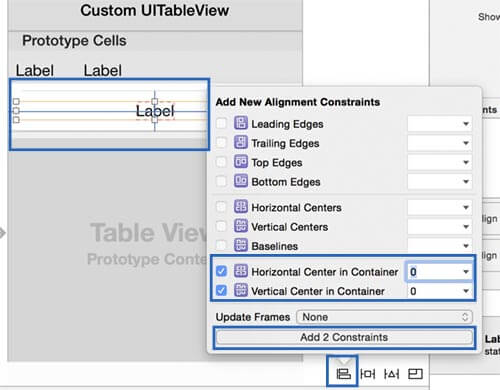
Add now two UILabel components inside the cell, one next to the other. Put the constraints.

Use the Assistant editor to link the labels to the CustomCell class. Once opened the Assistant editor in the bottom view be sure that the CustomCell class is selected. By holding CTRL, drag and drop the two component inside the CustomCell class and assign the variables index and name, respectively.
Link the UITableView component to the viewcontroller.swift too, by calling it tableview.
Coding part
Let's now start the coding part. Our goal is to fill the table view with 3 different sections, each with a different number of elements.
You'll define a datasource and a delegate for your tableview. In this example the datasource and the delegate will be defined in the viewcontroller class, but they can also be defined in an external swift file as well.
class ViewController: UIViewController, UITableViewDataSource, UITableViewDelegate {

    @IBOutlet var tableview: UITableView!

    var table_data = Array<TableData>()

    struct TableData
    {
        var section:String = ""
        var data = Array<String>()
        init(){}
    }

    override func viewDidLoad() {
        super.viewDidLoad()

        tableview.dataSource = self
        tableview.delegate = self

        var new_elements:TableData

        new_elements = TableData()
        new_elements.section = "Section 1"
        new_elements.data.append("Element 1")
        new_elements.data.append("Element 2")
        new_elements.data.append("Element 3")
        new_elements.data.append("Element 4")
        new_elements.data.append("Element 5")
        new_elements.data.append("Element 6")
        new_elements.data.append("Element 7")

        table_data.append(new_elements)


        new_elements = TableData()
        new_elements.section = "Section 2"
        new_elements.data.append("Element 1")
        new_elements.data.append("Element 2")

        table_data.append(new_elements)

        new_elements = TableData()
        new_elements.section = "Section 3"
        new_elements.data.append("Element 1")
        new_elements.data.append("Element 2")
        new_elements.data.append("Element 3")
        new_elements.data.append("Element 4")
        new_elements.data.append("Element 5")
        new_elements.data.append("Element 6")
        new_elements.data.append("Element 7")

        table_data.append(new_elements)

    }

    func tableView(tableView: UITableView, cellForRowAtIndexPath indexPath: NSIndexPath) -> UITableViewCell
    {
        let cell = tableView.dequeueReusableCellWithIdentifier("cell", forIndexPath: indexPath) as CustomCell

        cell.name.text = table_data[indexPath.section].data[indexPath.row]
        cell.index.text = String(indexPath.row)

        return cell

    }

    func tableView(tableView: UITableView, numberOfRowsInSection section: Int) -> Int
    {
        return table_data[section].data.count
    }

    func numberOfSectionsInTableView(tableView: UITableView) -> Int
    {
        return table_data.count
    }

}
Costum UITableView Header section
To add a custom UITableView header on the top of each sections, you'll have to turn back to the main.storyboard, select the table view and, under the attribute inspector, set the number of prototype cells to two. The first one will be used for the content while the second one for the custom header section. Create now a new ios cocoa touch file, call it CustomHeader and set it as subclass of UITableViewCell.
Turn back to the main.storyboard, select the bottom cell and set the class to CustomHeader while the identifier to customheader. Add to the second prototype cell the UILabel component.
Open now the assistant editor and link the label to the CustomHeader class. Call it section_title.
In the viewcontroller.swift class add the header section by exploiting the second prototype cell, called customheader.
func tableView(tableView: UITableView, viewForHeaderInSection section: Int) -> UIView? {
        let  headerCell = tableView.dequeueReusableCellWithIdentifier("customheader") as CustomHeader

        headerCell.section_title.text = table_data[section].section
        headerCell.backgroundColor =  UIColor(red:72/255,green:141/255,blue:200/255,alpha:0.9)

        return headerCell

    }

func tableView(tableView: UITableView, heightForHeaderInSection section: Int) -> CGFloat {
        return 70.0
}
You can also add on the right the buttons to directly access to the various sections.
    func sectionIndexTitlesForTableView(tableView: UITableView) -> [AnyObject]!
    {
        let sections_names = table_data.map { $0.section  }
        return sections_names

    }
Let's add a footer section
Let's now add the footer section by adding this codes inside the viewcontroller.swift.
    func tableView(tableView: UITableView, viewForFooterInSection section: Int) -> UIView? {
        let footerView = UIView(frame: CGRectMake(0, 0, tableView.frame.size.width, 40))
        footerView.backgroundColor =  UIColor.whiteColor()
        return footerView
    }

    func tableView(tableView: UITableView, heightForFooterInSection section: Int) -> CGFloat {
        return 100.0
    }
You can download the example from this link: Download the example.


Leave a comment