
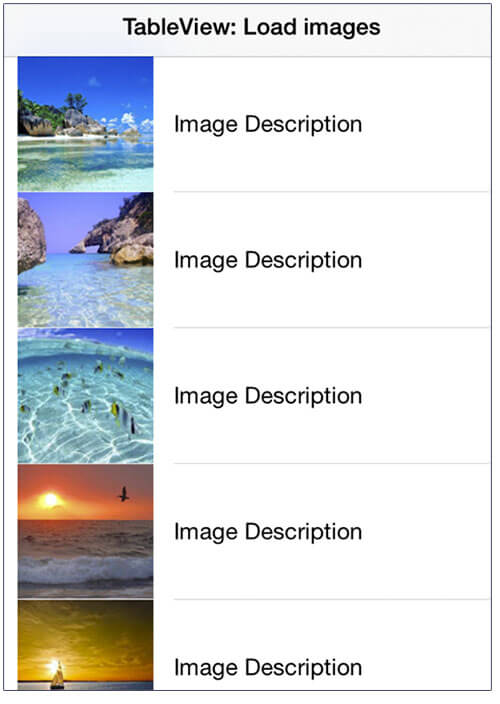
You'll learn how to cache data in swift by developing a local cache based on core data for the downloaded data. You'll see through an example how to define a custom Table View for iOS using Swift, how to load the json data that define the images urls and descriptions, how to load images from url and how to store image in core data. You'll see how to read the stored cached data from core data entity and display the images without dowloading them again.
Add the UitableView component
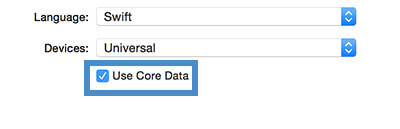
Create a new iOS single view applicaton project. Be sure to check that the use core data functionality is on.
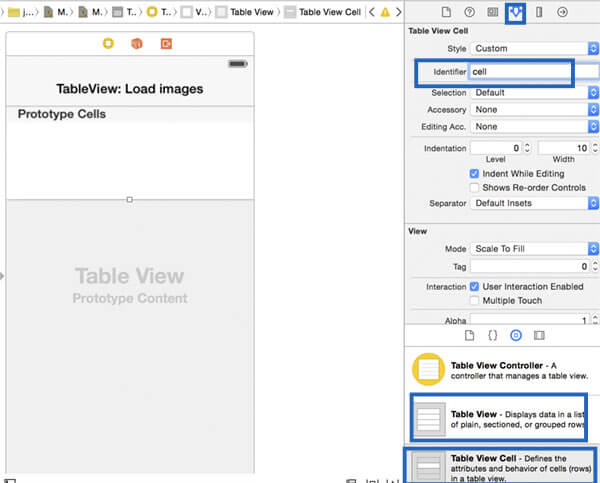
Let's now define the layout. Open the Main.storyboard (you can turn the use size classes functionality off) and put a UITableView component. Put inside the UITableView component the UITableViewCell.
With the previously added cell selected, set the reuse identifier (attribute inspector menu) to cell.
Open now the assistant editor and link the table view component to the ViewController class. Call the variable tableview.
.jpg)
Coding Part
For the Json data I've prepared for you a simple data structure. You can find it here. It is a simple array of objects. If you want, you can use this easy tool to explore the structure in a readable format.
Open now the ViewController and let's define the required variables.
    var json_data_url = "https://www.kaleidosblog.com/tutorial/json_table_view_images.json"
    var image_base_url = "https://www.kaleidosblog.com/tutorial/"
    var TableData:Array< datastruct > = Array < datastruct >()
    struct datastruct
    {
        var imageurl:String?
        var description:String?
        var image:UIImage? = nil

        init(add: NSDictionary)
        {
            imageurl = add["url"] as? String
            description = add["description"] as? String
        }
    }
    @IBOutlet var tableview: UITableView!
The TableData array will contain the json extracted list. Moreover it has also a UIImage variable (called image) that is initialized to nil. This variable will contain the image data, when available. This varialbe is used to define a local cache that will store for a given session the image data. In this way, when you scroll down the table the cell is reused for another image. As soon as you scroll up again the image is in the cache and will not be downloaded again.
Let's define now the Table view behaviour. Be also sure that the ViewController class implements also the UITableViewDataSource and the UITableViewDelegate.
 override func viewDidLoad() {
        super.viewDidLoad()

        tableview.dataSource = self
        tableview.delegate = self

        get_data_from_url(json_data_url)
    }


    func tableView(tableView: UITableView, cellForRowAtIndexPath indexPath: NSIndexPath) -> UITableViewCell
    {
        let cell = tableView.dequeueReusableCellWithIdentifier("cell", forIndexPath: indexPath) as! UITableViewCell

        var data = TableData[indexPath.row]


        cell.textLabel?.text = data.description

        if (data.image == nil)
        {
            cell.imageView?.image = UIImage(named:"image.jpg")
            load_image(image_base_url + data.imageurl!, imageview: cell.imageView!, index: indexPath.row)
        }
        else
        {
             cell.imageView?.image = TableData[indexPath.row].image
        }

        return cell

    }

    func tableView(tableView: UITableView, numberOfRowsInSection section: Int) -> Int
    {
        return TableData.count
    }
At this point we have the table view ready to display the data in a proper way, but we need now the data.
Define the Core Data Entity
Let's now define the Core data entity that will store the images in a permanent way. It means that if you close the app and you open it again, the data is still here. In this way the core data will be used for caching the download images.
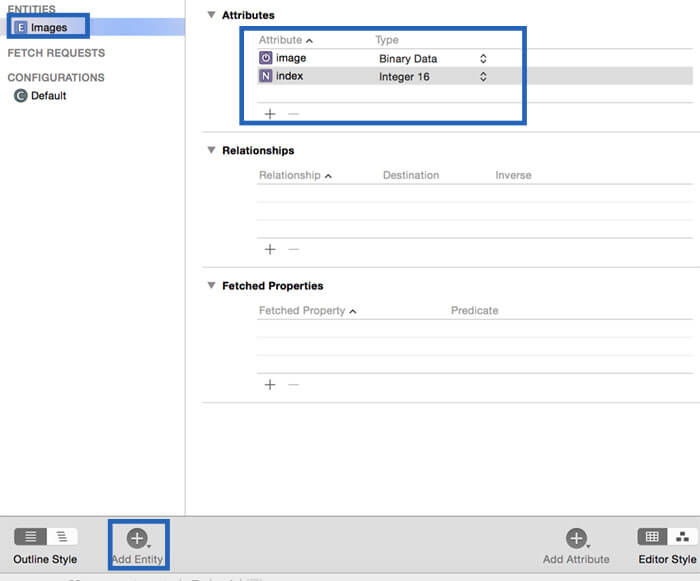
Open the xcdatamodeld and insert a new entity. Call it Images and add two attributes: image - Binary Data and index - type integer 16.
Downloading and extrating the data from JSON
Turn now back to the ViewController class. We'll define the functions that download the JSON data in an asynchronous way, extract the JSON data, fill the array with the data and refresh the table. After the JSON data are extracted, the read function is called. This function will be implemented in the next step and will read from the Core Data entity the stored data and will fill the TableData array with the cached images data.
    func get_data_from_url(url:String)
    {
        let httpMethod = "GET"
        let timeout = 15
        let url = NSURL(string: url)
        let urlRequest = NSMutableURLRequest(URL: url!,
            cachePolicy: .ReloadIgnoringLocalAndRemoteCacheData,
            timeoutInterval: 15.0)
        let queue = NSOperationQueue()
        NSURLConnection.sendAsynchronousRequest(
            urlRequest,
            queue: queue,
            completionHandler: {(response: NSURLResponse!,
                data: NSData!,
                error: NSError!) in
                if data.length > 0 && error == nil{
                    let json = NSString(data: data, encoding: NSASCIIStringEncoding)
                    self.extract_json(json!)
                }else if data.length == 0 && error == nil{
                    println("Nothing was downloaded")
                } else if error != nil{
                    println("Error happened = \(error)")
                }
            }
        )
    }


    func extract_json(data:NSString)
    {
        var parseError: NSError?
        let jsonData:NSData = data.dataUsingEncoding(NSASCIIStringEncoding)!
        let json: AnyObject? = NSJSONSerialization.JSONObjectWithData(jsonData, options: nil, error: &parseError)
        if (parseError == nil)
        {
            if let list = json as? NSArray
            {
                for (var i = 0; i < list.count ; i++ )
                {
                    if let data_block = list[i] as? NSDictionary
                    {

                        TableData.append(datastruct(add: data_block))
                    }
                }
                read()
                do_table_refresh()

            }

        }
    }


    func do_table_refresh()
    {
        dispatch_async(dispatch_get_main_queue(), {
            self.tableview.reloadData()
            return
        })
    }
Download the image and update the UITableViewCell
Let's now define the function that will download the image from url, update the TableData local cache (for that session), update the Core data (for the permanent cache) and finally update the UITableViewCell image.
 func load_image(urlString:String, imageview:UIImageView, index:NSInteger)
    {

        var imgURL: NSURL = NSURL(string: urlString)!
        let request: NSURLRequest = NSURLRequest(URL: imgURL)
        NSURLConnection.sendAsynchronousRequest(
            request, queue: NSOperationQueue.mainQueue(),
            completionHandler: {(response: NSURLResponse!,data: NSData!,error: NSError!) -> Void in
                if error == nil {
                    self.TableData[index].image = UIImage(data: data)
                    self.save(index,image: self.TableData[index].image!)

                    imageview.image = self.TableData[index].image

                }
        })

    }
Store image in Core Data: Write and read the data cache
Let's now define the functions that will read and store the data in core data. Be sure to import the CoreData library. The UIImageJPEGRepresentation function let us convert the jpg image to a data format that can be stored and cached in core data.
    func read()
    {
        let appDelegate = UIApplication.sharedApplication().delegate as! AppDelegate
        let managedContext = appDelegate.managedObjectContext!
        let fetchRequest = NSFetchRequest(entityName: "Images")

        var error: NSError?
        let fetchedResults = managedContext.executeFetchRequest(fetchRequest, error: &error)
            as! [NSManagedObject]?

        if let results = fetchedResults
        {
            for (var i=0; i < results.count; i++)
            {
                let single_result = results[i]
                let index = single_result.valueForKey("index") as! NSInteger
                let img: NSData? = single_result.valueForKey("image") as? NSData

                TableData[index].image = UIImage(data: img!)

            }
        }

    }

    func save(id:Int,image:UIImage)
    {
        let appDelegate = UIApplication.sharedApplication().delegate as! AppDelegate
        let managedContext = appDelegate.managedObjectContext!

        let entity = NSEntityDescription.entityForName("Images",
            inManagedObjectContext: managedContext)
        let options = NSManagedObject(entity: entity!,
            insertIntoManagedObjectContext:managedContext)

        var newImageData = UIImageJPEGRepresentation(image,1)

        options.setValue(id, forKey: "index")
        options.setValue(newImageData, forKey: "image")

        var error: NSError?
        managedContext.save(&error)

    }
The read function let you read all the image you've stored in core data. The save function will store image in core data.
Download the example.
UPDATE: Download the example for swift 2 from here
If you enjoyed this tutorial, share it. You can fine more Swift tutorial here.
For any question, be free to write a comment below.


Leave a comment